
1) Started opening it up.
![[IMG]](https://fbcdn-sphotos-c-a.akamaihd.net/hphotos-ak-ash3/t31.0-8/1276134_477051542425165_5222644007941526979_o.jpg)
2) My box of watercooling bits which has accumulated over a long period of time.
![[IMG]](https://fbcdn-sphotos-b-a.akamaihd.net/hphotos-ak-frc1/t31.0-8/906585_477051559091830_8945894957772314347_o.jpg)
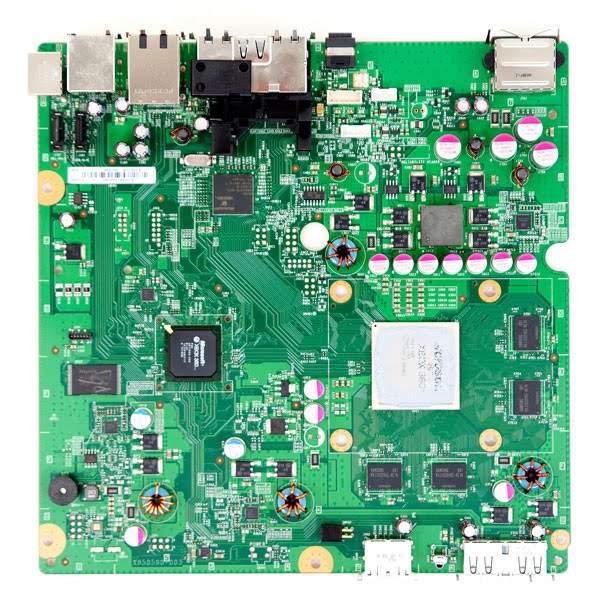
3) Exposed.
![[IMG]](https://scontent-b-lhr.xx.fbcdn.net/hphotos-prn2/t31.0-8/966226_477051562425163_2413372453429697565_o.jpg)
4) I always make a mess. Test fitted the waterblock/pump combo and fitted in the first twin 40mm Radiator.
![[IMG]](https://scontent-b-lhr.xx.fbcdn.net/hphotos-ash4/t31.0-8/10372967_477051615758491_6228097360495388837_o.jpg)
5) Managed to find some long thin bolts which worked perfectly for my use! No need to drill through the metal case. These were also long enough.
![[IMG]](https://scontent-a-lhr.xx.fbcdn.net/hphotos-frc3/t31.0-8/10272572_477051702425149_7881609774522560272_o.jpg)
![[IMG]](https://scontent-b-lhr.xx.fbcdn.net/hphotos-frc3/t31.0-8/10380097_477051709091815_6641513234836435606_o.jpg)
6) Better view of the motherboard and the cooling setup:
![[IMG]](https://fbcdn-sphotos-f-a.akamaihd.net/hphotos-ak-frc3/t31.0-8/10353459_477051815758471_8513016217487486622_o.jpg)
![[IMG]](https://fbcdn-sphotos-a-a.akamaihd.net/hphotos-ak-ash3/t31.0-8/10265412_477051842425135_2688665067741986116_o.jpg)
7) I did test it like this aswell but I didn't like it and the air flow would have been a problem. I really want everything as flush as possible so to put fans on the top would be quite a bulge.
![[IMG]](https://scontent-b-lhr.xx.fbcdn.net/hphotos-prn2/t31.0-8/1556201_477051832425136_4062999639661173796_o.jpg)
8) With the CD drive in, to route the pipes and cut them to size.
![[IMG]](https://fbcdn-sphotos-g-a.akamaihd.net/hphotos-ak-frc3/t31.0-8/10258407_477051902425129_4797141402455987418_o.jpg)
9) Originally I was going to mount the Side blowing fan on the second rad but decided against it in the end.
![[IMG]](https://scontent-a-lhr.xx.fbcdn.net/hphotos-prn2/t31.0-8/10298603_477052049091781_4949535310975877856_o.jpg)
VIDEO LINK:
https://www.youtube.com/watch?v=jDjwMds2EdQ
10) And the clear case like this.![[IMG]](https://scontent-b-lhr.xx.fbcdn.net/hphotos-prn2/t31.0-8/10014254_477052029091783_7969948697799616253_o.jpg)
11) Pic.![[IMG]](https://fbcdn-sphotos-a-a.akamaihd.net/hphotos-ak-frc1/t31.0-8/10257778_477052089091777_2301178632544691439_o.jpg)
12) After endless messing round with trying to fit the 6mm blue tubing on the rads, I decided to just go for a normal Clear tubing which I found in one of my drawers. This was actually more better for flexibility! I put on some spare anti kink coils on that I had. Would have been better in blue? Also added my T-line for the fillport.![[IMG]](https://fbcdn-sphotos-c-a.akamaihd.net/hphotos-ak-prn2/t31.0-8/1504417_477052182425101_4502208298373031413_o.jpg)
VIDEO LINK:
https://www.youtube.com/watch?v=oTJZJgxd3hM
https://www.youtube.com/watch?v=RYZK66RFyPE
13) Potentiometer:![[IMG]](https://fbcdn-sphotos-e-a.akamaihd.net/hphotos-ak-prn2/t1.0-9/10363878_477052185758434_2236290605236327691_n.jpg)
VIDEO LINK:
https://www.youtube.com/watch?v=Df8R2rGkBK8
14) Cutting time! -For the rad.
![[IMG]](https://scontent-b-lhr.xx.fbcdn.net/hphotos-frc3/t31.0-8/10371232_477052212425098_6684976636147622689_o.jpg)
15) Done/![[IMG]](https://fbcdn-sphotos-b-a.akamaihd.net/hphotos-ak-frc3/t1.0-9/10378940_477052272425092_4209499428989803566_n.jpg)
16) Fitted the rad too to test.![[IMG]](https://fbcdn-sphotos-d-a.akamaihd.net/hphotos-ak-ash3/t31.0-8/1796959_477052325758420_8217309867229863796_o.jpg)
VIDEO LINK:
https://www.youtube.com/watch?v=EYMOlpRo2tM
17) Cut the second rad casing to make room and easy installation of the 40mm Fans. ![[IMG]](https://fbcdn-sphotos-f-a.akamaihd.net/hphotos-ak-prn2/t31.0-8/10258822_477052329091753_5744201360886999724_o.jpg)
18) Installed!![[IMG]](https://scontent-a-lhr.xx.fbcdn.net/hphotos-prn2/t31.0-8/10355548_477052422425077_6234798233060836329_o.jpg)
19) Wired up the Pump to the original fan adapter.![[IMG]](https://fbcdn-sphotos-h-a.akamaihd.net/hphotos-ak-prn2/t1.0-9/10341976_477052499091736_1493207032734424439_n.jpg)
![[IMG]](https://scontent-a-lhr.xx.fbcdn.net/hphotos-frc3/t1.0-9/10308197_477052475758405_4670447324721431022_n.jpg)
20) More test fitting! Progress! I'm surprised it's taking me this quick tbh.![[IMG]](https://fbcdn-sphotos-b-a.akamaihd.net/hphotos-ak-frc3/t31.0-8/10259107_477052592425060_9049138253132304854_o.jpg)
21) Linked up to my PC and motor + Fans run perfectly! Tested the pot and that works too! Awesome!![[IMG]](https://scontent-b-lhr.xx.fbcdn.net/hphotos-frc3/t31.0-8/10285216_477052625758390_6156828882703052272_o.jpg)
22) CD drive inserted.![[IMG]](https://fbcdn-sphotos-f-a.akamaihd.net/hphotos-ak-prn2/t1.0-9/q79/s720x720/10339677_477052652425054_5743344065327948937_n.jpg)
23) Looks better!![[IMG]](https://scontent-a-lhr.xx.fbcdn.net/hphotos-frc3/t1.0-9/q77/s720x720/10374466_477052689091717_2663615080811002820_n.jpg)
24) Testing time!![[IMG]](https://fbcdn-sphotos-a-a.akamaihd.net/hphotos-ak-prn2/t1.0-9/q72/s720x720/10375020_477052725758380_958554663455257495_n.jpg)
Note: I have a video of the first start-up, it failed.
VIDEO LINK:
https://www.youtube.com/watch?v=TwP_HAoGjFQ (FAIL LOL)
Then was working after the fix so the picture is below ![]()
25) Fans, and pump all working. It's incredibly quiet!![[IMG]](https://scontent-b-lhr.xx.fbcdn.net/hphotos-prn2/t1.0-9/q71/s720x720/10365841_477052859091700_8688799228796763514_n.jpg)
VIDEO LINK:
https://www.youtube.com/watch?v=4-6OB1ydB-o&feature=youtu.be